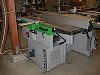
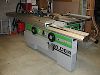
The planer/jointer/mortiser, configured as a jointer. The infeed table, which supports the fence, is at right; you adjust its height with the bar just right of center. The outfeed table is at left (near the large post to which the dust collector hose is attached). The four planer knives are on a head between the infeed and outfeed tables; they're partly covered by a safety guard in this photo. The red "stop" button is clearly visible left of center. Next to it are the green "start" button and the speed control knob.
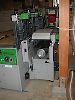
The mortising table attaches to the side of the planer/jointer. The green box in the center of the jointer contains a chuck in which you mount cutting bits for mortising. The table has stops that you can adjust to control the width and depth of the mortise, and a clamp to hold the workpiece. You just set everything up and use the lever at right to move the workpiece past the cutting bit. Since the bit is driven along with the planer, you use the planer's controls to vary the speed for mortising. (Would have been nice to have enough RPM to run regular router bits here, but hey, there's always some tradeoff.)
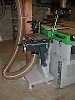
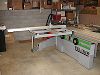
The planer/jointer/mortiser, configured as a planer. To convert from jointer to planer, you tilt the jointer's infeed and outfeed tables up and out of the way, then swing the dust-collection hood up over the planer head. You adjust planing height with the gauged handwheel at center, and change feed rate with the vertical lever below and left of center.
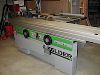

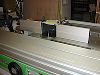
The saw/shaper, and sliding table in its most basic configuration. On/off switches and speed-control knob for the saw are on the chassis at the right. The gauged handwheel visible at right of center controls the saw blade tilt. (Blade height is controlled by another wheel on a part of the chassis that's not visible here.) The switches left of center turn the shaper on and off; the yellow light indicates whether the shaper is rotating clockwise (rather than the normal counterclockwise); and the small knob near the saw tilt wheel controls shaper speed. The gauged handwheel left of center controls shaper tilt; as with the saw blade, shaper height is controlled by another wheel that's not visible from this point of view. Behind the saw blade is a riving knife, which helps prevent the workpiece from binding to the back of the blade. The blade guard has been removed for this photo.
A view inside the saw/shaper chassis. The shaper spindle bracket is visible roughly at center. The saw blade and its dust-collection shroud are at right. Wires leading from the electronics compartment to the planer/jointer/mortiser are just visible at the bottom of the photo. All this is normally hidden behind a sliding cover, but you need to expose it to change the shaper spindle, move the shaper spindle belt to a new position (for a new range of speeds), or change the saw blade.
The shaper housing and fences. The shaper spindle is visible inside the housing at center. Typically you'd either run the workpiece along the fences (using some protective gear that's not shown here), or clamp the workpiece to the sliding table and move that past the shaper cutterhead.
The sliding table in full-forward position. It fits with inches to spare in both directions; it's just possible to make a full-length cut in 8-foot stock.
This is one way to configure the sliding table for large workpieces. The outrigger attaches to the sliding table and to the support arm (which is otherwise stored flat against the chassis). Various devices, including the long crosscut fence shown here, attach to the outrigger. This particular outrigger also has the indexed miter option, which allows you to set the crosscut fence to specified angles up to 45 degrees. Work can be clamped to the outrigger or to the sliding table itself. When you don't need the full setup for large work, you can remove the outrigger; a shorter crosscut fence and a parallel fence can be attached directly to the sliding table.
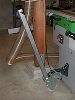
Believe it or not, it's fairly easy to move the whole machine. There are rollers on the long side of the chassis, but normally it rests on adjustable feet. Slip the wheeled lever onto the bracket shown here, and you can lift the machine off the feet and move it on the rollers. I have to do this when cutting an 8-foot panel precisely in half, or when mortising a large workpiece like a door; otherwise the basement's center post gets in the way.